
For the last three years I have made a pinata for E's party. This year I wanted to make more than just Olaf's head, I wanted to make his whole body. I thought about making it with different sized balloons taped together to make him rounder but then his head had me a bit baffled so I decided to go with cardboard.

- Draw out his body. For the bottom circle I traced around a dinner plate. For the middle circle I traced around a salad plate and then I eyeballed the head and feet. I used sticks for the arms but if you wanted to make arms out of cardboard you could cut those out as well. Cut out two silhouettes.

2. Cut out long strips of cardboard as thick as you want your pinata to be. I made mine approx 3. inches.

4. Grab some tape and start taping around the edge of your silhouette. Be sure to make it nice and secure! Also be sure to leave an opening at the top to put the candy inside.


6. You are now going to tape the other silhouette to the other side of your box to close up the back. Once again tape around the edges.

7. I wanted my face to be a little more 3D so I shaped some tin foil and taped it to his face.


8. Next I covered it with paper mache. Be sure to really focus on the face and the edges to seal it all up.


9. Once I was satisfied with my paper mache I stuck him over the heat register to dry. For projects like these I really miss the dry heat of Vegas!


10. Once he was all dry I covered him with a layer of paint to make sure the colors didn't show through once I added the tissue paper.

11. Next I cut ups strips approx 3 1/2 inches wide of tissue and I clipped them every 1/4 of and inch.

12. I then grabbed my glue gun and started gluing the tissue to my snowman. I wrapped it in layers from the bottom to the top.

13. Once he was all covered I added a sring to hang him up through the hole in the top of his head. I also cut out a mouth and some eyes from cardstalk and scrap booking paper. I then taped those to his face.

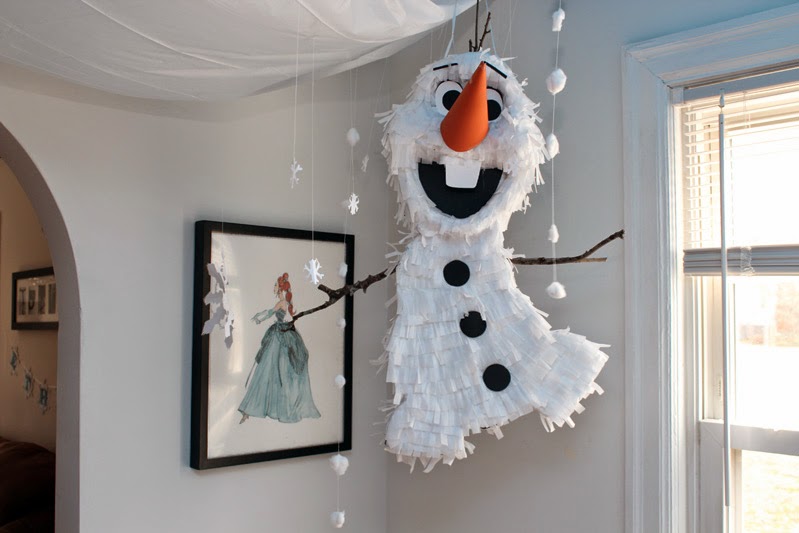

16. Throw a party and break him apart!!! He was super durable and Daddy actually had to rip him open since none of the girls were even making a dent! It was an awesome DIY project and I'm super stoke dto see what other pinata's I can make in the future!!
4 comments:
I am not sure why it won't let me post a reply to your comment so I apologize. I am using blogger and I really like it. It is user friendly and I have never had any issues. You do have to shrink your pictures to 800px however or else you will run out of "room" on your blog after awhile. they do not counting pictures at 800px or less.
Also I tried checking out your page and the link says that it is not available??
Post a Comment