
I really get a thrill out of making my own piñatas. And while they aren't a perfect as one that you would buy there is a deep sense of satisfaction that comes from rocking out your own piñata! However they are not for the faint of heart. In total this piñata took me over13 hours to complete. They are a labor of love but if you are up to it they are SO fun! Here are some instructions of how I assembled my mermaid piñata, if you want further detail you can also click here.

1. I made my mermaid in three parts; body, head and arms. for her body I took a nice piece of cardboard the size I needed and drew out my mermaid.Then I cut around her body to get my silhouette and traced around that onto another piece of cardboard to make the back. Cut out the back.

2. Cut out long strips of cardboard as thick as you want your pinata to be. I made mine approx 3. inches.

4. Grab some tape and start taping around the edge of your silhouette.
Be sure to make it nice and secure! Also be sure to leave an opening at
the top and at the arms so that you can attach the head and arms.

6. You are now going to tape the other silhouette to the other side of
your box to close up the back. Once again tape around the edges.


9. Set her aside.

10. For her arms I used a animal balloon and curled it as desired. Then I paper mached around it for some arms.


13. Then I covered the entire mermaid really focusing on the arm holes, neck hole and her fins and seashells. Let dry completely and add several layers until you reach your desired thickness.


16. Paint her body a flesh tone color.
17. Paint seashells desired color.

18. For the hair, cut strips of tissue paper. Mine are about 1 1/4" wide. Starting at the base of the neck glue the hair on row by row.


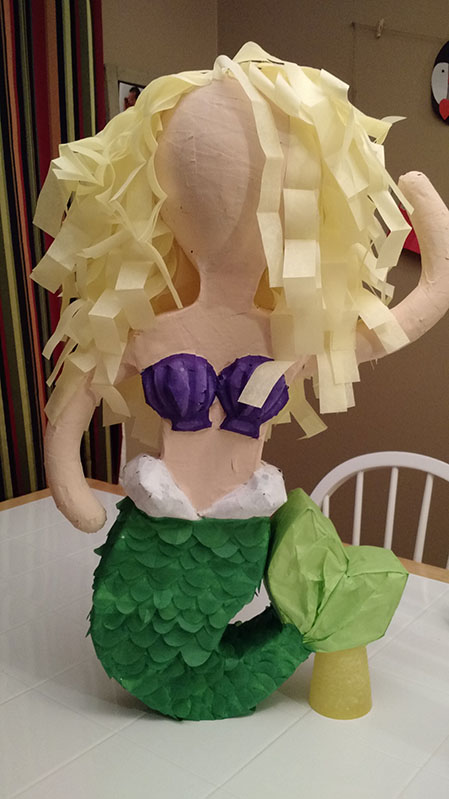
(hair is complete)

19. Paint on a face and cut a hole in her back (where the hair covers) to put in the candy. Put a string through her shoulders to hang her. Sit back and admire all of your hard work!!


I am so in love with her! It almost feels wrong breaking her after so much effort but the best part is, me daughter loves her too!!!

4 comments:
Nice
Wow very cool..yes seems a shame to have to destroy all that hard work. Still that's what they're made for 😆 great tutorial..
Thanku
so pretty! I love your idea for the arms
How clever you are. I haven’t seen this foundation cardboard before. Very innovative.
Post a Comment