Search This Blog

Showing posts with label Home Decor. Show all posts

Tuesday, March 20, 2018

DIY Christmas Stocking

 I have been wanting to make new stockings for awhile now. The ones we have are from when I was growing up. They are denim and flannel and are HUGE! I am trying to convert over to a timeless Christmas theme in our home consisting of silver, whites and gold. I saw this picture on Pinterest and that is exactly what I wanted for stockings. Simple, clean, and fun texture.

So one morning Mom and I hit up Savers and I got a few sweaters. 

I made up a pattern.

Turned the sweater wrong side out and positioned it as desired. I wanted them to be different lengths, adding a touch of variation so I positioned the pattern down a bit on a few socks. 

Cut around the sock.

The first sock we tried to just surge around the edge without pinning and it turned out horribly. It was all stretched out and a total flop. So we switched the surger so that it gathered slightly, keeping things nice and tight, pinned like crazy and added some thin strips of cotton cut along the grain line to help keep it from stretching.

We then surged around the edges. 

 So Beautiful!!! Then we turned them right side out and added loops to hang them up on. (Which I should have taken a picture of because Mom made some beautiful loops.)

Repeat for additional socks.

Hang them up and admire!

I am so in love with this room! So festive, so cozy! The stocking really pull it all together!! 

Okay Santa, we are almost ready for you!

Friday, February 3, 2017

DIY One Board Step Stools

Once you have made something, it becomes an addiction. Gretchen and I were perusing Pinterest and came across these step stools. SO cute, had the instructions right there, and were made from one board! So we shipped off to Home Depot. Armed with our $6 boards, we decided that we would cut the boards at home, and it was a good yet, tricky thing. Cutting wood with 5 kids it gets tricky to keep all of the measurements straight. We realized that we would need a table saw so I asked the neighbor across the street if he had one. He did and for a candy bar he cut the wood for us! It was a beautiful thing and a table saw is next on my wish list for tools! 

All of our wood cut, sanded and pocket holes drilled.
 This was a super fast project to put together! 

My super cute assistant Gretta who sat there watching me the entire time. :)

 And done! I went with a grey wash for the steps and solid white on the sides and I LOVE it! The painting was the longest part! We use it all the time!

 Love the little angled sides!

 I then decided that I needed a second one since the kiddos were stealing it to use elsewhere in the house! This time I went with a Dark Walnut top and I couldn't love it more!!! 

 The only issue with having step stools in the house, it means nothing is safe. Duke now climbs into all of the cupboard but really, these stools are just beyond functional, sturdy for me and the kiddos and $6 a piece!!!!!!! So in love! Now, what else should I build?

DIY Mirror Frame

While I was in Houston I was talking with my SIL and I was trying to decide what to put in my living room over my couch. The room is already pretty busy with a boot cubby, built in book shelves and a photo collage wall, so I wanted something big but simple. She suggested a mirror and I was sold.  I started looking online to find something I liked and everything ranged from $100 - $300. Seriously?! I knew I could do it for cheaper. 

This was one of those projects that was super simple... but everything went wrong. I found the mirror online for $20. It was a bit more than I wanted to spend but it was a good size at 30"x 40". I then went to Home Depot to figure out exactly how I wanted to frame it. I was pretty decided on trim until I realized that it would be about $50 to get enough trim to frame the mirror and by that time I may as well have bought the mirror at IKEA for $100. So I bought two 1x4's for $5, grabbed some mirror hooks and came home. I wanted it to look farm house-ish so I opted for straight edges instead of framing the corners at 45 degree angles. 

 I originally had my heart set on distressing the wood so I started with a layer of stain. 

 Then I lightly painted on a layer of white very unevenly.

 Once that was dry, I went to town with the sander. 

Using the Kreg Drill I drilled some pocket holes and this is where things started going crazy. I tested out a 2 1/2" screw in a test board and it went in beautifully. Went to screw my frame together, first screw poked right through the front! Thankfully it wasn't too bad and I could fix it with a clamp and some wood glue. I then used 1 1/4" screws to attach the frame together which worked wonderfully! 

 
 I placed the mirror face down onto the frame and ran into my second problem. The screws were too long and would poke out the front. I could have used a hack saw to shorten them but instead we just bought shorter screws. 


 I then realized that my mirror was TOO THICK for my mirror hooks. SERIOUSLY?! I just couldn't catch a break. So back to Home Depot Jakob went this time so I didn't look like a baboon. 


 I drilled pilot holes into the frame and screwed the new mirror hooks with the short screws to the frame attaching the mirror. 

 That evening Jakob and I went to hang up the finished product. We realized that this mirror was ridiculously  heavy and unless we found a stud (or 6) to hang it into it would fall. Plus if anyone one have bumped it we may also run the risk of it falling down. SO we took the mirror off the frame and attached it directly to the wall. Then we hung the frame over the mirror. It was time consuming but it is much sturdier!

 I took a step back to admire my work.... and I hated it. It just looked home made and that bothered me like no other. The white looked more grey and it just wasn't what I was looking for. So I took the frame off the wall, since the mirror and the frame were conveniently separate. I sanded off all of the white paint. Added a bit more stain. Sanded it again and......

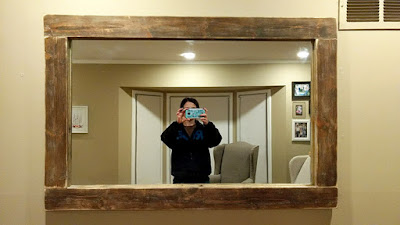
 So much better!!

 I love the distressed look. Dark Walnut is my favorite stain ever! 
It really finishes off the space and while it isn't perfect... I love it. Thank you so much for the suggestion Janet! I'm glad to have this project checked off of my list!

Wednesday, November 16, 2016

Tufted Headboard

 As a general rule Gretchen and I try to trade off on projects. I've horded all of project time lately so I was beyond excited to work on something for her! Her project of choice you ask? A tufted headboard. Totally new territory for both of us but gosh we were excited! Here is a quick and dirty break down of what we did. (If you want a better tutorial there are TONS on Pinterest.)

 We started with a board at the appropriate dimensions for her bed and then we added a 2x4 frame cutting the top corners at a 45 degree angle. We clamped them on and attached them to the headboard with screws.
 Then we laid the memory foam mattress inside the frame. (I found the mattress on the curb and it had a few stains on it so we sprinkles baking soda on top of it to soak up the yucky and then we vacuumed it off.)
Using the hole in the mattress we marked where our tufts would be with a marker.

 Then we drilled through the wood at each mark. This was SUCH a game changer! No measuring, or counting we just followed the dots!


 We put the foam back in and started stringing on some buttons, starting at the center and working our way out and around. This was totally a two man job. Gretchen was on top threading the needle down to me I would pull it tight to her liking and staple the strings to the back. 

 Once we had all of the tufts, she wanted a metal bead trim and oh my gosh was it sexy!!! And SUUUUUPER simple to attach!

And the final product. Thee was a learning curve and we would have done a few things differently. We need to cut the legs down by 6" but for a first attempt I think it turned out great!!! So much fun and we got it done start to finish in one day with four kiddos! That right there deserves a high five! Now to build some Christmas presents.
Related Posts Plugin for WordPress, Blogger...