Search This Blog

Showing posts with label Toys. Show all posts

Thursday, April 6, 2017

Super Hero Pegs

I have been wanting to make super hero pegs for Duke for the longest time. So this month I finally got around to doing it. I would have to admit I think my painting has come a long way from when I first started making these things.

Designing the super hero's was a ton of fun. I used some pictures from Pinterest for inspiration but I also went from actual pictures of the characters which was neat.

These pegs were slightly wider than the pegs I used for E's doll so I was only able to fit four across. I also wanted the Hulk to be bigger than everyone else and I just love how he turned out. My favorite one is Captain America though, while Batman is my favorite super hero I loved painting Captain America, I am really pleased with how he turned out.

The box was such a challenge for me. I knew I wanted the inside to be all "secret hideout" but I had no idea what to paint. I figured while most of the super hero's don't use guns, Daddy would appreciate a few firearms, an American flag (even though I'm Canadian), and a computer.

The outside had me baffled, and finally after staring at the box for more than a week I decided to just paint it as though it were hidden in the forest. I don't love it, but Duke was pleased as punch and that is what mattered!

So glad to FINALLY have this project off of my list!

Tuesday, January 24, 2017

Things that Go Quiet Book - Build a Car!

While this page isn't difficult at all... it is seriously time consuming! There is a lot of cutting and sewing involved but it is so worth it. This is another one of my son's favorite pages. While I have a lot of cars on this page I have included even more in the pattern! Once I started I just couldn't stop!

This is also the only page that I did any sort of embroidery. I wanted to steer clear from embroidery as much as possible because while it is really easy to do, I just feel like it intimidates people. This page would be just as cute without the embroidery too, but I felt that it helped that page make a bit more sense. 

Here are a few of my favorite car combos. The taxi, which was a mental exercise to get it to work. But I am so pleased with how it turned out! 

Fire truck!
And the police car. I love how many combinations the my son can make! I actually find myself playing with this page too mixing and matching! 

This pattern for this page is available for purchase via my Etsy shop and as always thank you so much for your support and interest in my work!

Thursday, September 29, 2016

DIY Kids Wood Kitchen

I have been wanting to make E a kitchen for quite sometime. In my original minds eye I had planned on making her one out of an entertainment center. I even went as far as purchasing one and hauling it up 100 stairs from some mans garage. Then it sat in my garage for 6 months and I decided it wasn't exactly what I had in mind after all. So I went exploring on Pinterest (where would I be without you?!) And I found this. It was perfect, came with instructions and was cute as cute could be!

With my new saw and my best friend we set to work. There was cutting, sanding, measuring, and more cutting and sanding. 

And sometimes your projects fight back!

This sweet girl was the best helper! She is really good at hammering!

Oven assembled.... man I can hardly stand how CUTE it is!! This bad boy was a bit of a pain. In the original plans it doesn't have you cut the board small enough to allow the oven door to be flush, so I had to change that. Then I cut a board at 4" out of my scraps to save some money instead of buying a 4" board but forgot that 4" boards aren't actually 4" they are more like 3 3/4" (+/-) so I had to sand down that top lip where it meets the oven door....

I was squatting a bit too long while I was sanding and this is what happened to my toes.... Ouch! 

Putting in a few more nails! 

And they are assembled (I still need to put in the sink and per E's request I made cupboard doors for the sink instead of a curtain.)

So we don't have a jig saw and by this time my budget for this project we pretty tapped, so I got creative and used a drill to drill as much as I could out and then I used an exacto knife to cut out the remaining wood. Let me tell you.... it was a pain in the butt... but it worked. 
I did the same process for the sink....
 And it ended up being TOO SMALL!!!! AHHH! So I grabbed Jakob's scout knife (okay it's a bit bigger than a scout knife) and I started carving away.... it was ridiculously frustrating... BUT IT WORKED! 
 
It was at this point that I decided that I really wanted an extra shelf in the "freezer" section of the fridge. But I didn't have enough wood. Some wood glue took care of that and I pieced together another shelf. 

Time to paint it Elsa blue!

So much paint!!! I painted the inside of the fridge, oven and sink white and then I painted thhe outsides blue. I really liked how it gave it a bit more dimension!

And the big reveal! Drum roll please!!!!
 Seriously though, I couldn't love it more!!!!

 I love that it is three separate pieces which makes for a lot of versatility.

 I love how tall and skinny the fridge is. I saw a few others that were wider but this really just is perfect!

 I added a galvanized piece of metal that I purchased on Amazon here. (You can find them at Home Depot too.) It was too wide and I didn't have any way to cut it so I just folded one side under which worked brilliantly. I then screwed it to the side. Looking back, I'm not sure if I would have done the magnet board as E really doesn't do much with it. She does on occasion hang up some of her pictures but not sure if it was worth the extra $6 for the metal. I had considered doing a chalk board along this side, but then I didn't want them coloring all over the set, which I knew would be inevitable.

 This little magnet was a must! I got in the clearance section at Michaels.

 The oven is my favorite piece. I got the knobs on Amazon here. The pull is from IKEA. Which is the same pull we used on the fridge. I love the plexiglass oven door (which has been jumped on and replaced 3 times now ;).)

 But my favorite feature is the little light inside the oven. I used one of the sticky back lights that you can push on from the dollar store and I stuck it behind where the knobs are so the kiddos could reach it. It just adds that extra little something something!

 As mentioned before the E requested that we putt cupboard doors on instead of a curtian which I love! They magnet shut, and the curtian while adding color just added a bit of chaos in my OCD mind.

 The faucet I purchased on Amazon here. And it was my most expensive accessory. I also ordered a bowl on Amazon that was 9" in diameter and it was TOO BIG! There wasn't enough room for the lip and it just didn't fix. I was soooo disappointed. Thankfully I have a collection of bowls in my kitchen and so I just used one of those. It's approx 6" in diameter which seemed super tiny, but once it was installed it worked like magic!

 All of her pots, pans, tea set and cashier. 

 Oven with the Pizza!

And all of the food fits in the fridge. Most of her pretend food is from IKEA. I love their felt food and their pots and pans. The felt pizza I made last year.

This was SUCH a fun project to make! I seriously was in heaven the whole time!!! Now I want to build sooo many things. Next up, a step stool, and a kitchen table with benches!!!

Wednesday, September 28, 2016

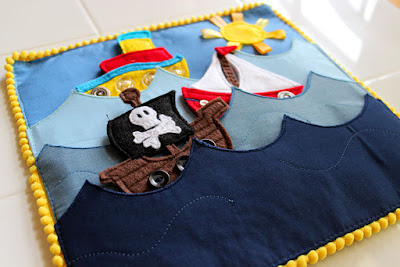
Things that Go Quiet Book - Boats

 I am so beyond excited to introduce my latest quiet book. This bad boy has hands down been my quickest quiet book to date. My son is three and currently into all things cars, planes, and trains. He loves all things that go and since my previous books have primarily been for my daughter, I wanted to make him something special just for him!

My first page is boats. The theme for this book was to keep. it. simple. I didn't want to ton of parts or pieces. I wanted the back ground to be clean, but still have some excitement while not being overwhelming to assemble. 

 These little boats were a blast to make! To be honest the pirate ship is hands down my favorite but it's all about the buttons. I have a fairly extensive stash and I had all of my buttons on hand but buttons are a key element in this book! 

 I also love the different colors in the water. In my church quiet book I did a fishing page where I made the water out of felt. While that was super simple to work with and really quick, after the years there has been some wear and tear on the felt whee it has pilled or stretched out. I didn't want that to be an issue this time around and I LOVE how the cotton looks and feels and it will hold up to little hands! 

I felt that this page itself needed a touch of texture and color other than blue. I love the sun and the ribbon and how it gives that little extra pop! 

This pattern for this page is available for purchase via my Etsy shop and as always thank you so much for your support and interest in my work!

Tuesday, September 27, 2016

Things that Go Quiet Book - Dump Truck

 My son's first birthday was construction themed, so I just HAD to have a dump truck! 

 I love the colors, the different layers of dirt in the background (which are totally optional), and the big wheels! 

 The back bucket dumps which I think is SUPER fun! 

And you can take out the dirt. I have thought about making some rocks to go in there too. I think that would be fun! This was such a fun make to design. Made me miss my little one year old boy! How time flies! 

This pattern for this page is available for purchase via my Etsy shop and as always thank you so much for your support and interest in my work!
Related Posts Plugin for WordPress, Blogger...